Installation and configuration of Laravel Echo Server
Today we will install and configure the combination of Laravel Echo Server and Socket.IO.
Laravel Echo Server is the server-side part of the Laravel Echo package, which allows establishing a connection between the client and server side, enabling real-time message exchange.
Socket.IO is a client-side library for working with Socket.IO, which provides the ability to establish a two-way connection between the client and server in real-time. Socket.IO is a popular module for working with web sockets and provides support for instant two-way communication between the client and server.
The installation will be carried out on Laravel 10 and Node.js v12.22.12.
- Install the laravel-echo-server package globally.
npm install -g laravel-echo-server
- Initialize the Laravel Echo Server at the root of your Laravel project
laravel-echo-server init
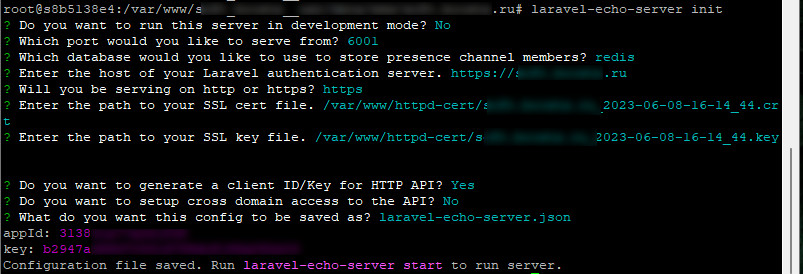
- Create the configuration for your laravel-echo-server. Example of filling in:
 At the root of the project, a configuration file laravel-echo-server.json should appear. If necessary, you can always change the settings in it and restart laravel-echo-server to apply the new configuration.
 - Install Laravel Echo and necessary dependencies on the client side (for example, socket.io-client):
npm install --save laravel-echo socket.io-client
- Then, in your bootstrap.js (resources/js/bootstrap.js) write:
import Echo from 'laravel-echo'; import io from 'socket.io-client'; window.io = io; window.Echo = new Echo({ broadcaster: 'socket.io', host: window.location.hostname + ':6001', encrypted: false, transports: ['websocket'], }); - Rebuild your frontend
npm run prod. - In app/Events create a class (in my case it’s TopServiceProgressUpdated.php with the content):
namespace App\Events; use Illuminate\Broadcasting\Channel; use Illuminate\Broadcasting\InteractsWithSockets; use Illuminate\Broadcasting\PresenceChannel; use Illuminate\Broadcasting\PrivateChannel; use Illuminate\Contracts\Broadcasting\ShouldBroadcast; use Illuminate\Foundation\Events\Dispatchable; use Illuminate\Queue\SerializesModels; class TopServiceProgressUpdated implements ShouldBroadcast { use Dispatchable, InteractsWithSockets, SerializesModels; public $topServiseProgress; / * Create a new event instance. * * @return void */ public function __construct($topServiseProgress) { $this->topServiseProgress = $topServiseProgress; } / * Get the channels the event should broadcast on. * * @return \Illuminate\Broadcasting\Channel|array */ public function broadcastOn() { return new Channel('top-service-progress'); } } - To pass data to our event, use the following code where needed:
TopServiceProgressUpdated::dispatch($data);
- Subscribe to the event. For example, in your blade template:
window.Echo.channel('top-service-progress') .listen('TopServiceProgressUpdated', (event) => { console.log('Progress task: ', event.topServiseProgress.original); }); - I recommend adding additional code for debugging to verify the correctness of the connection setup:
window.Echo.connector.socket.on('connect', () => { console.log('Socket connected'); }); window.Echo.connector.socket.on('disconnect', (reason) => { console.log('Socket disconnected:', reason); }); window.Echo.connector.socket.on('connect_error', (error) => { console.error('Connection error:', error); }); - Don’t forget to change your channel for receiving events in .env and config/broadcasting.php (specified in laravel-echo-server.json as «database»). By default, data will be received in laravel.log.
Initialization Error «laravel-echo-server: command not found»
If you receive laravel-echo-server: command not found when entering the command laravel-echo-server init, you should follow these steps:
- Check if laravel-echo-server is installed globally: Make sure that laravel-echo-server is present in the list.
npm list -g --depth=0
- If it’s not installed, try installing it again:
npm install -g laravel-echo-server
- Check the PATH environment variable: Ensure that the path to global npm packages is included in the output.
echo $PATH
- If the path is missing, add it to the PATH in your profile file (e.g., ~/.bashrc or ~/.bash_profile for Bash):
export PATH=$PATH:$(npm config get prefix)/bin
- Then apply the changes: or restart the terminal.
source ~/.bashrc
- Try initializing laravel-echo-server again:
laravel-echo-server init
Other Possible Errors
In my case, I encountered the following error:
Connection error: Error: It seems you are trying to reach a Socket.IO server in v2.x with a v3.x client, but they are not compatible (more information here: https://socket.io/docs/v3/migrating-from-2-x-to-3-0/)
I had to revert to an older version of socket.io using the following command:
npm install socket.io-client@2.3.0 --save